
Accounts
Accounts 101: Storefront & organization management features
We are excited to introduce self-service features that allow you to purchase licenses and manage your organization independently! Accounts connects seamlessly with the Ratio.City platform, giving you control over your experience.
This guide will help you navigate the new features, whether you're a solo user or managing a large team. You'll learn how to purchase a license, manage your organization, and more.
What would you like to do?
View & manage my organization (invite members, assign licenses, activate/deactivate etc)
Review roles & permissions within your organization (owners vs organization members)
For existing (or legacy) users:
Most of the self-management functionality covered in this document is applicable to new users who have purchased licenses after November 2025 (through the new storefront features). If you’re a paid user who had a license before that date, you’re able to:
Sections and features that are applicable to both new and legacy users include the following 💡 Note: Applicable to users who purchased licenses outside of the storefront features.
For any other license, data, or billing changes, please contact our team directly at hello@ratio.city and we’ll be happy to help you.
Update my profile details & password
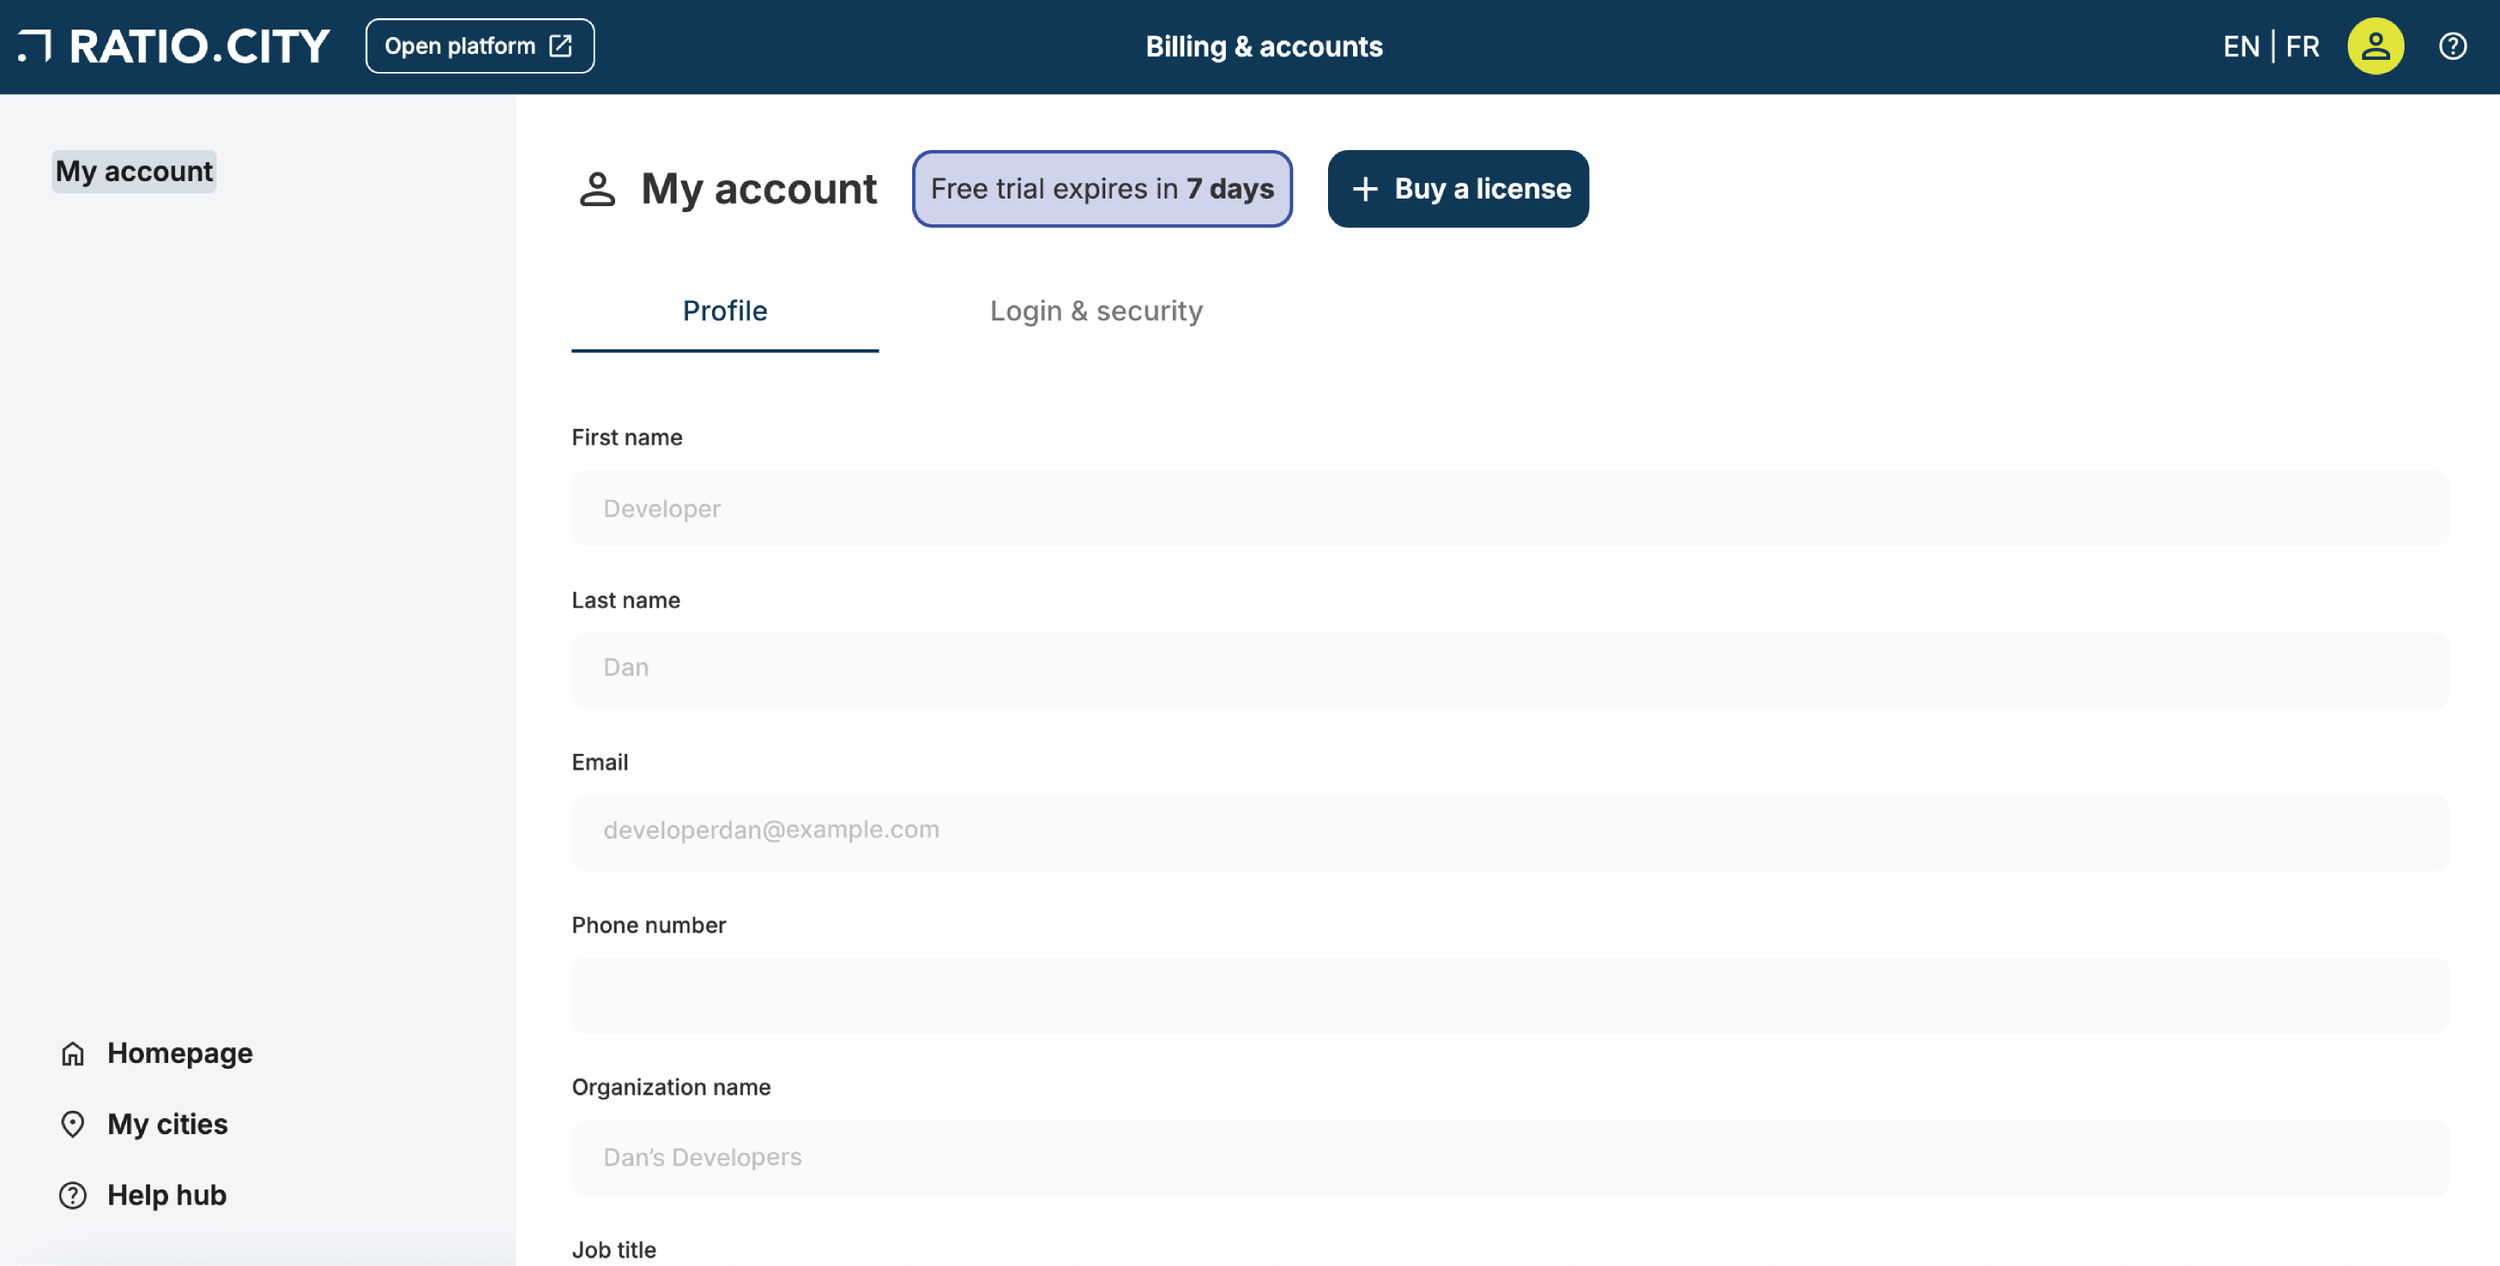
Users can access Accounts from within the Ratio.City platform by clicking on their avatar and selecting ‘Accounts & billing’. After logging in via the Accounts URL OR navigating there from the Ratio.City platform, ‘My account’ is the landing page (shown below).
Under the ‘Profile’ tab, there are details pertaining to the user's information which (some) can be modified. The ‘Login & security’ tab is the location to change password details for Ratio.City.
💡 Note: Applicable to users who purchased licenses outside of the storefront features.
Purchasing a subscription
A subscription with Ratio.City consists of two parts:
License(s): Can be a combination of Builder and/or Explorer licenses. These give you access to features on the Ratio.City platform (further details available here).
Data bundle: 1 data package is included with license pricing and you have the option to add more data packages at additional cost. This gives you access to data in specific geographic regions.
To begin the process of purchasing a subscription, users can click on the ‘+ Buy a license’ button on the ‘My account’ page and follow the instructions in the pop-up to get started. Below is some further information that you might find useful during the purchasing process.
If you’re already part of an organization and looking to buy additional licenses, please see this section.
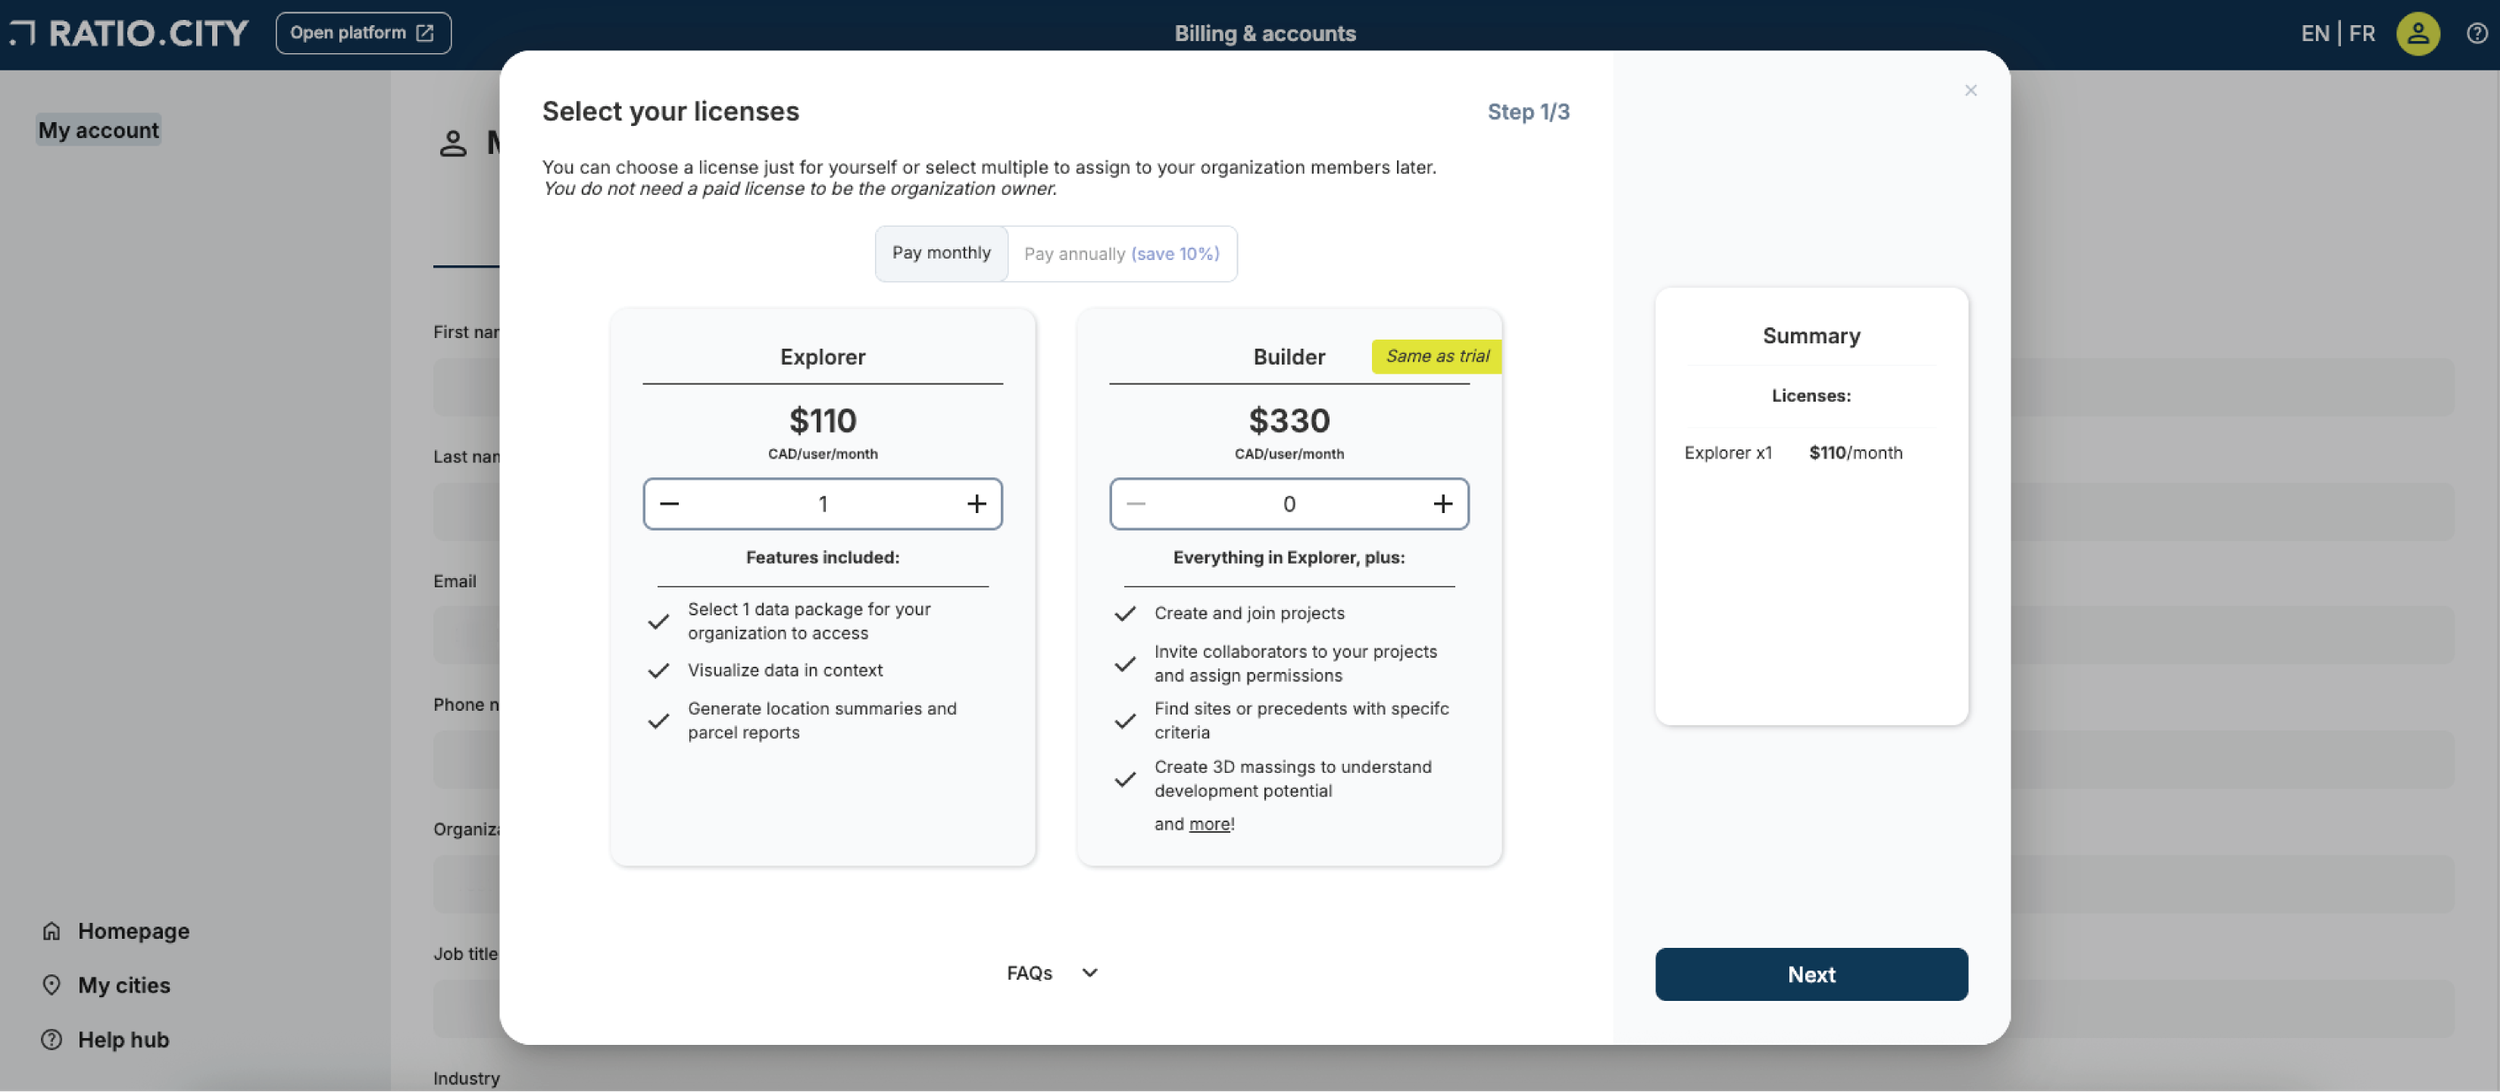
Step 1: Select your licenses
Annual vs monthly subscription
You can select between a monthly or annual subscription at the time of purchase.
💡 Note: Volume discounts are available for more than 5 annual licenses. Email our team at hello@ratio.city to set this up.
Explorer vs Builder
You can choose licenses for either Explorer, Builder, or a combination of both depending on your team’s needs.
There is detailed information on what is included in each license type on our pricing page.
💡 Note: The Builder license is what is included in the free trial and offers full access to the tools and features on the platform.
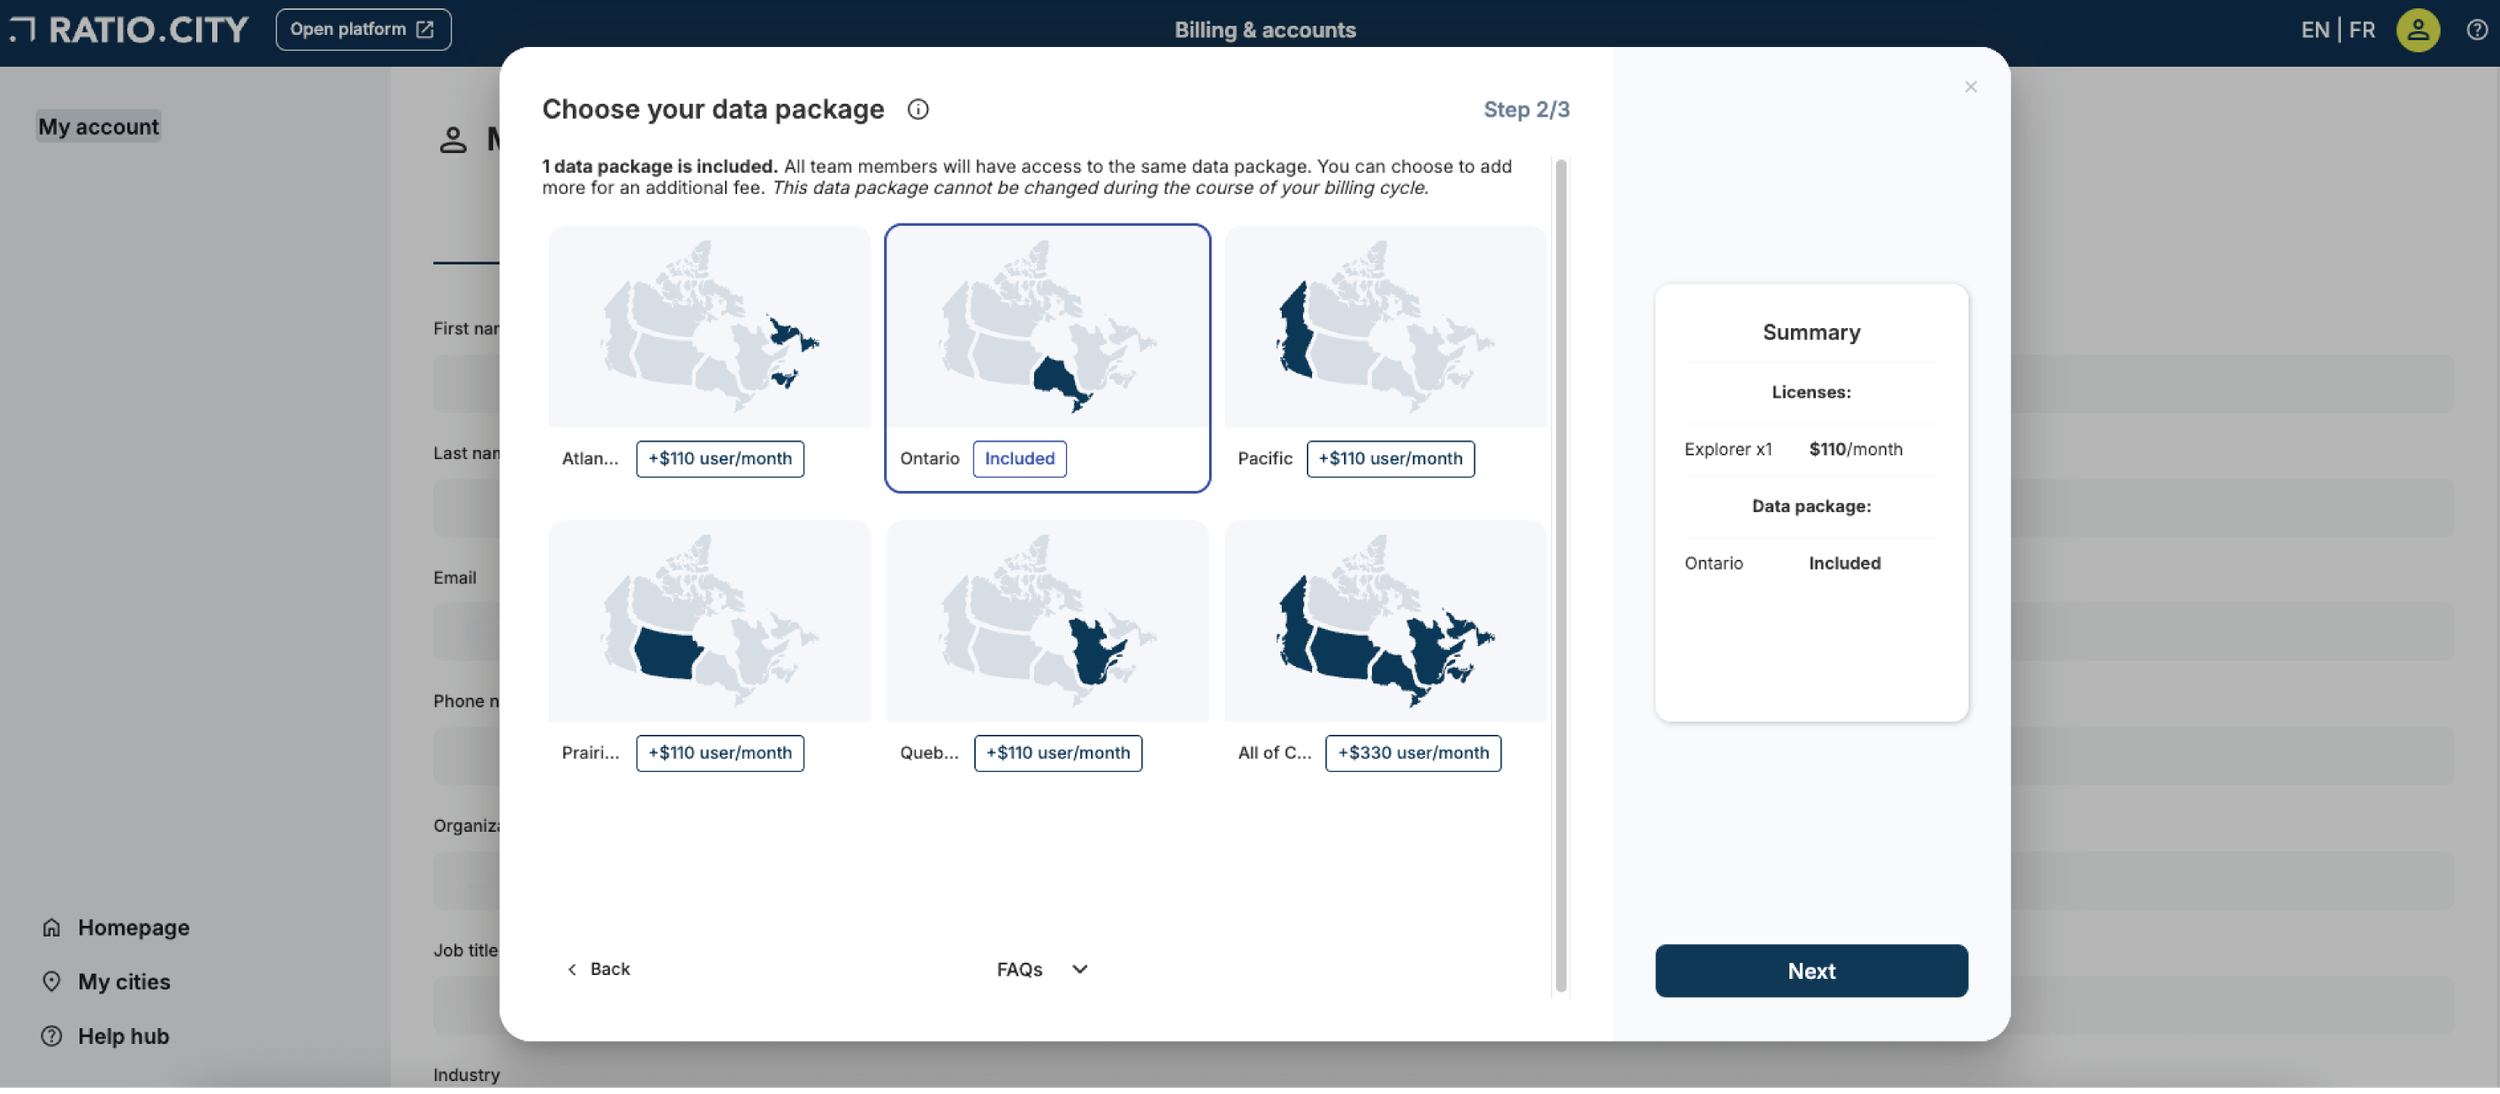
Step 2: Set up your data bundle

Select the data region(s) that you want to access with your subscription. The data region(s) apply to your entire organization, so everyone will have access to the same data (it cannot be assigned per user).
1 region is included in the license pricing, with the option to add additional ones at a rate of $100/region/user/month (annual subscription) or $110/region/user/month (monthly subscription).
If 4 regions are selected, you’ll qualify for the ‘All of Canada’ package at the equivalent price and it will be automatically selected.
To learn more about what data is available in each region, have a look at our data layers page.
Step 3: Confirmation & payment

Confirmation
Review your selected license(s) and data bundle in this section. Make any changes to the number of licenses, and/or return to the previous pages to modify your selections before proceeding with payment.
We offer credit card payments through Stripe. If you want to use an alternative payment method, please contact our team to arrange it.
Payment through Stripe
We’ve integrated Stripe for a fast, secure, and seamless payment experience. Stripe is a trusted payment provider, ensuring that every transaction is handled with the highest level of security and reliability.
You’ll be redirected to Stripe to complete the payment for your subscription. Taxes are calculated based on the shipping address, reflecting the location where the Ratio.City platform is intended to be used.

Successful payment
Congratulations! You’ve successfully made your first purchase and created your organization. You can now invite others to your organization and assign the license(s) you’ve purchased.
View & manage my organization

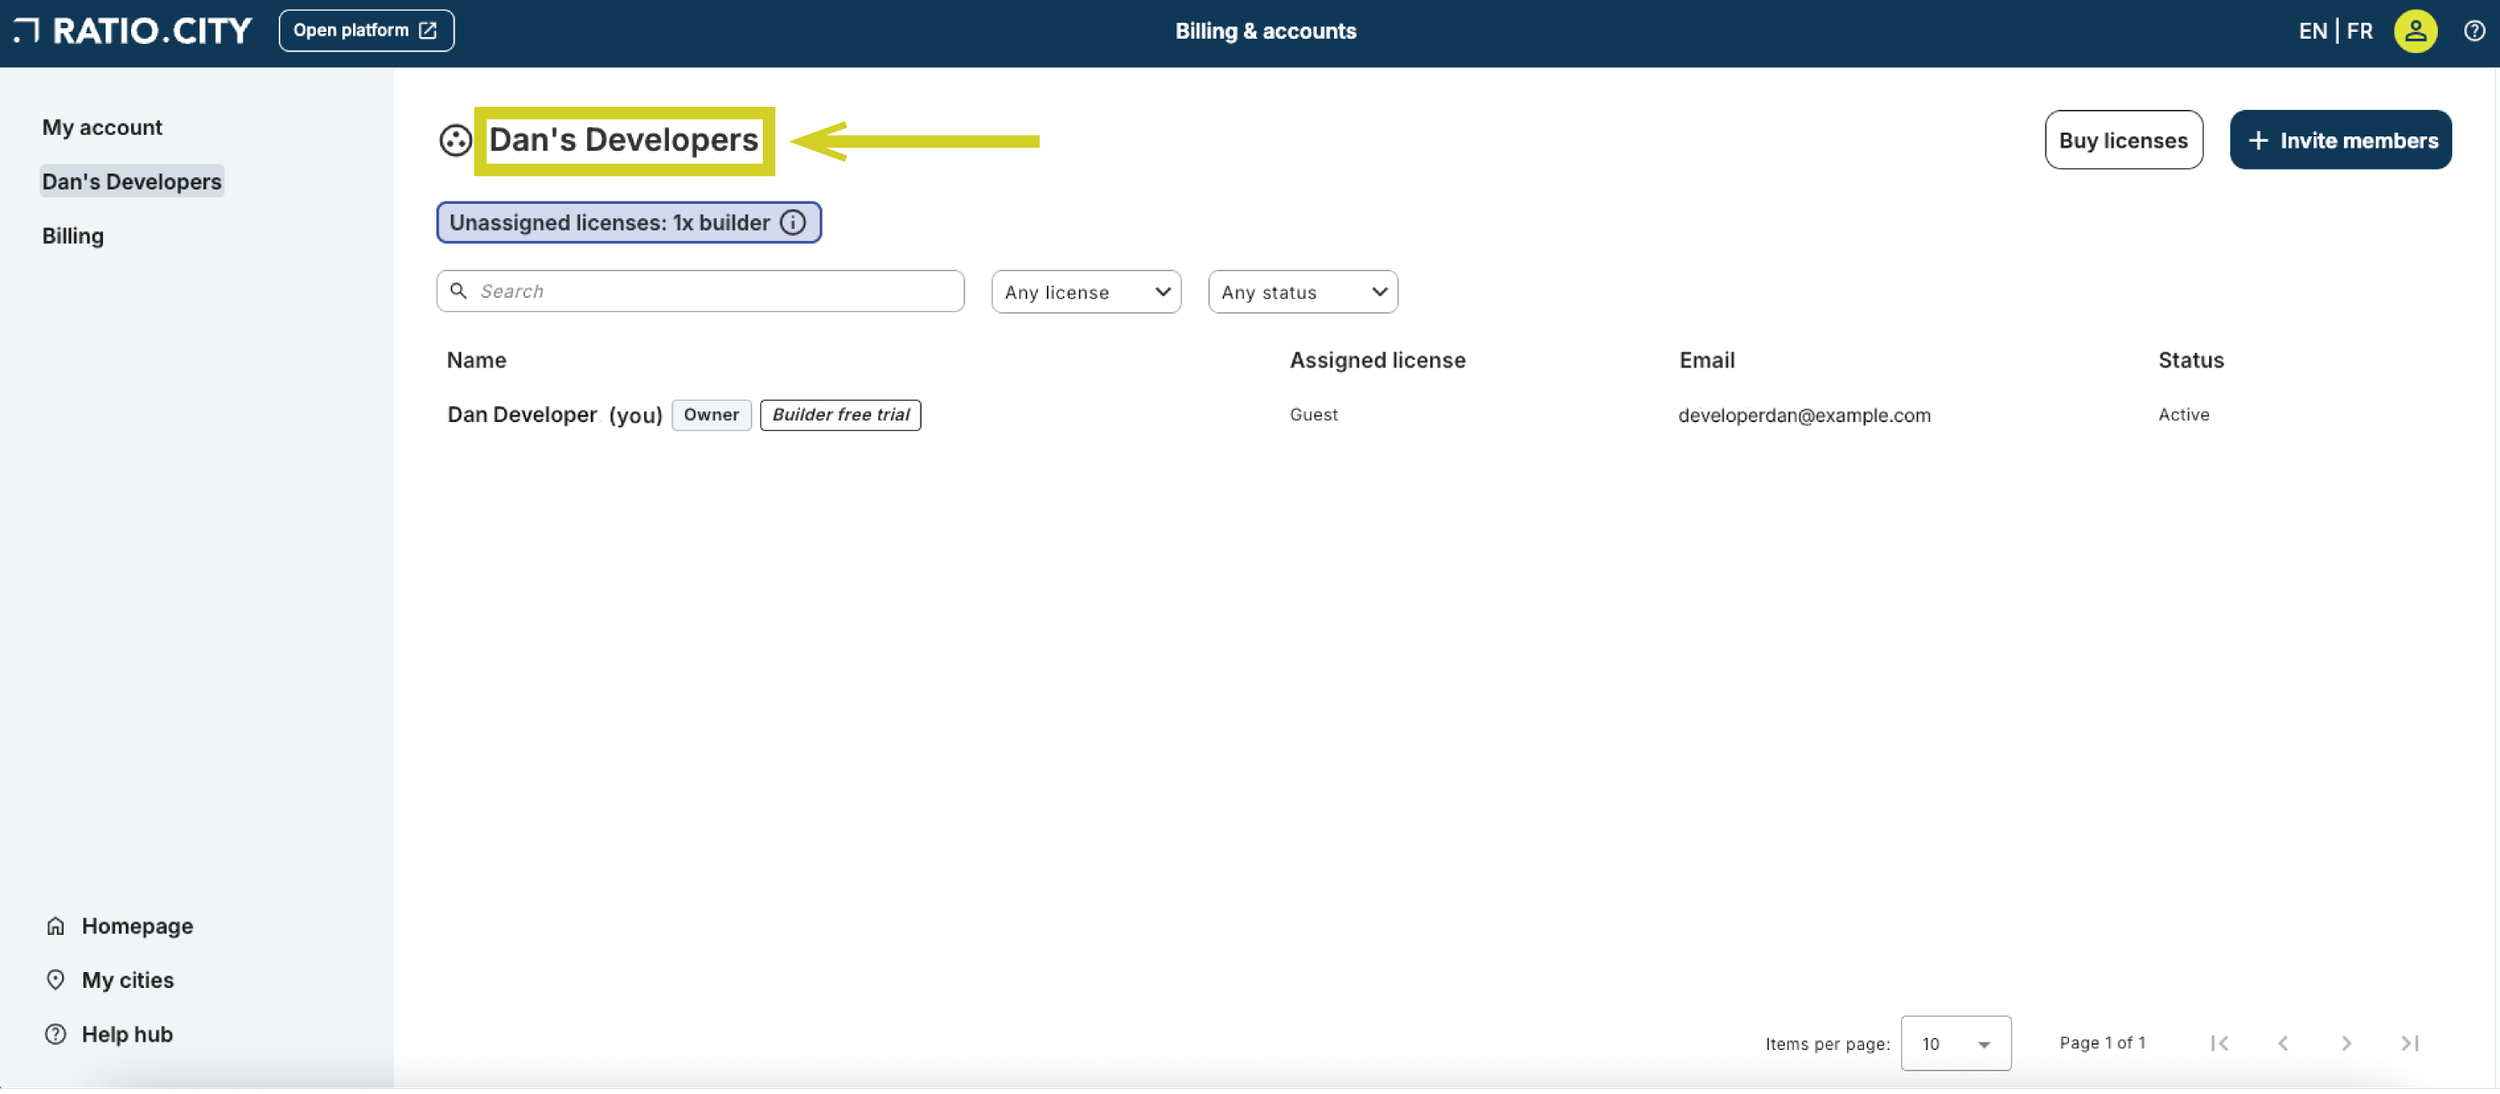
An organization and billing section will be added to your Accounts page once a purchase has been made. You’ll find it in the left panel beneath ‘My account’.
💡 Note: Within an organization there can be owners AND organization members. Please see the ‘Roles and permissions’ section for further details on the differences between owners vs organization members.
The following section breaks down some features and functionality available to ‘owners’ of an organization.
💡 Note: If you purchased your Ratio.City licenses outside of the new storefront features, you will see the organization page but will not see a ‘Billing’ section (as payment was setup outside of Stripe). Features available to these legacy users will be indicated with a note (*Applicable to users who purchased licenses outside of the storefront features).

Renaming the organization
We’ve provided a default name which can be changed by clicking the name at the top of the screen and typing in a new one. Click outside the active text box to save your change.
💡 Note: Applicable to users who purchased licenses outside of the storefront features.
Inviting colleagues to join the organization

You can invite as many colleagues as you want to join your organization. To start, click ‘+ Invite members’ in the top right corner (on the organization page) and enter the email address of the colleague you want to invite. You’ll see a list of pending invitations, which will expire after 1 week. If your colleague hasn’t accepted the invitation by that point, you’ll need to invite them again.
💡 Note: Be sure to remind your colleagues to check their junk or spam folders as it is possible that invitations could be redirected.
💡 Note: If you’re not receiving the invitation email, there could be a firewall which prevents it from coming through. Verifying with your IT team may be helpful if you have not received the invitation.

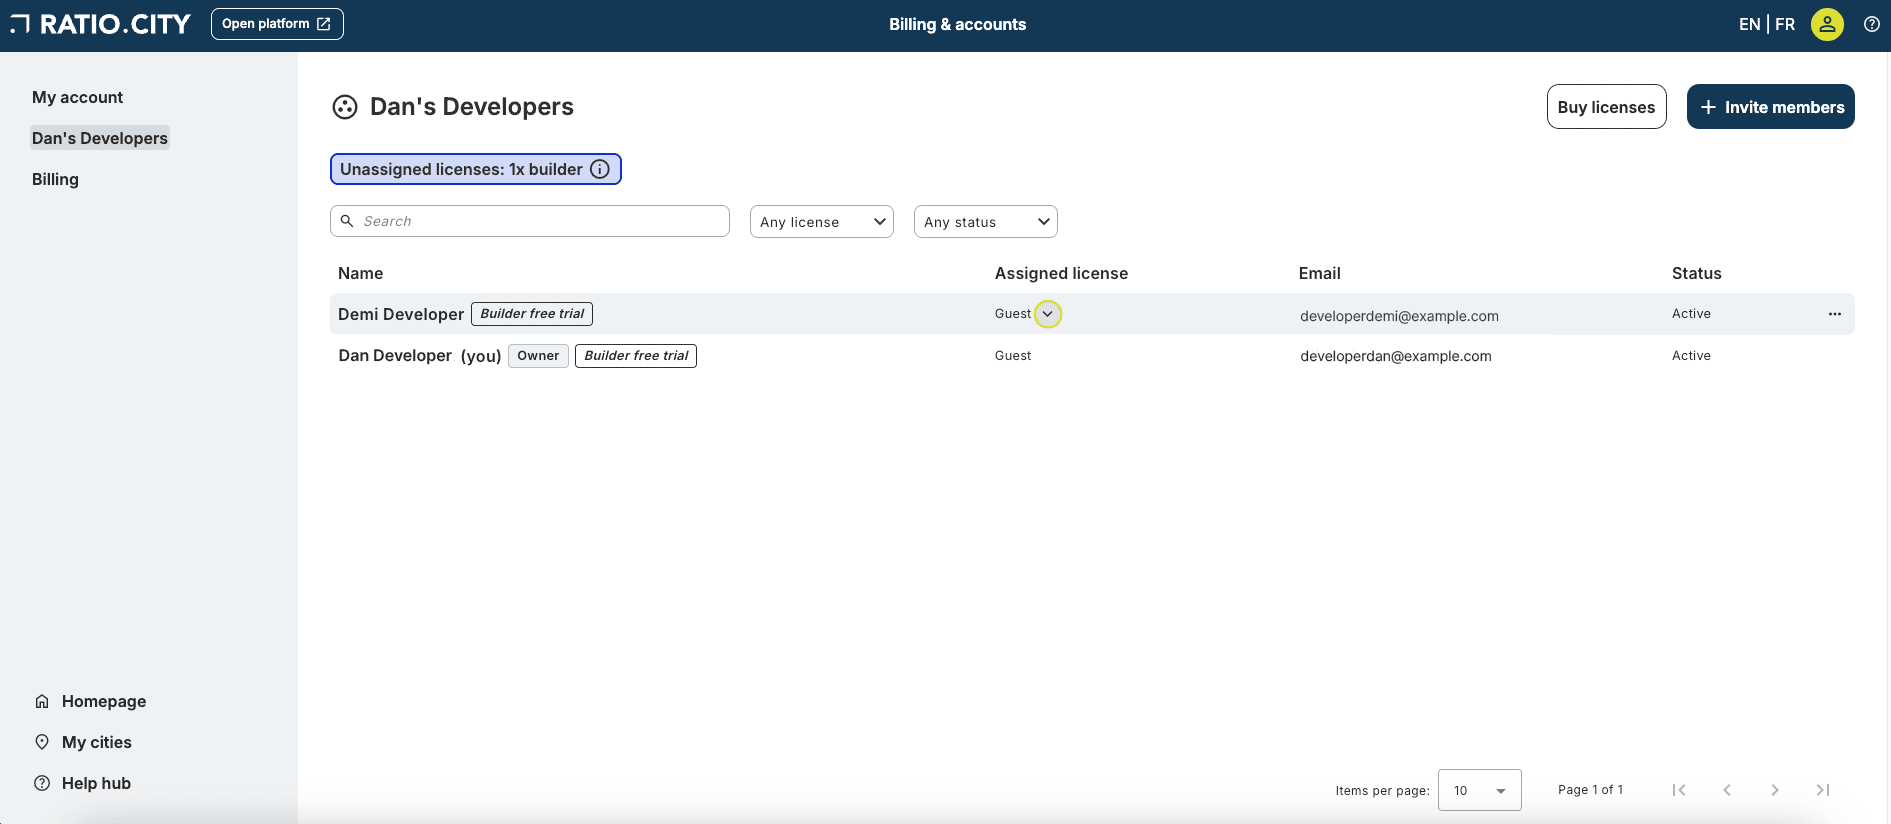
Assign licenses to members
Once your colleague has registered and accepted the invitation, they’ll become a member of your organization and you'll be able to assign them a license. They’ll appear in your organization list as a Guest user at first.
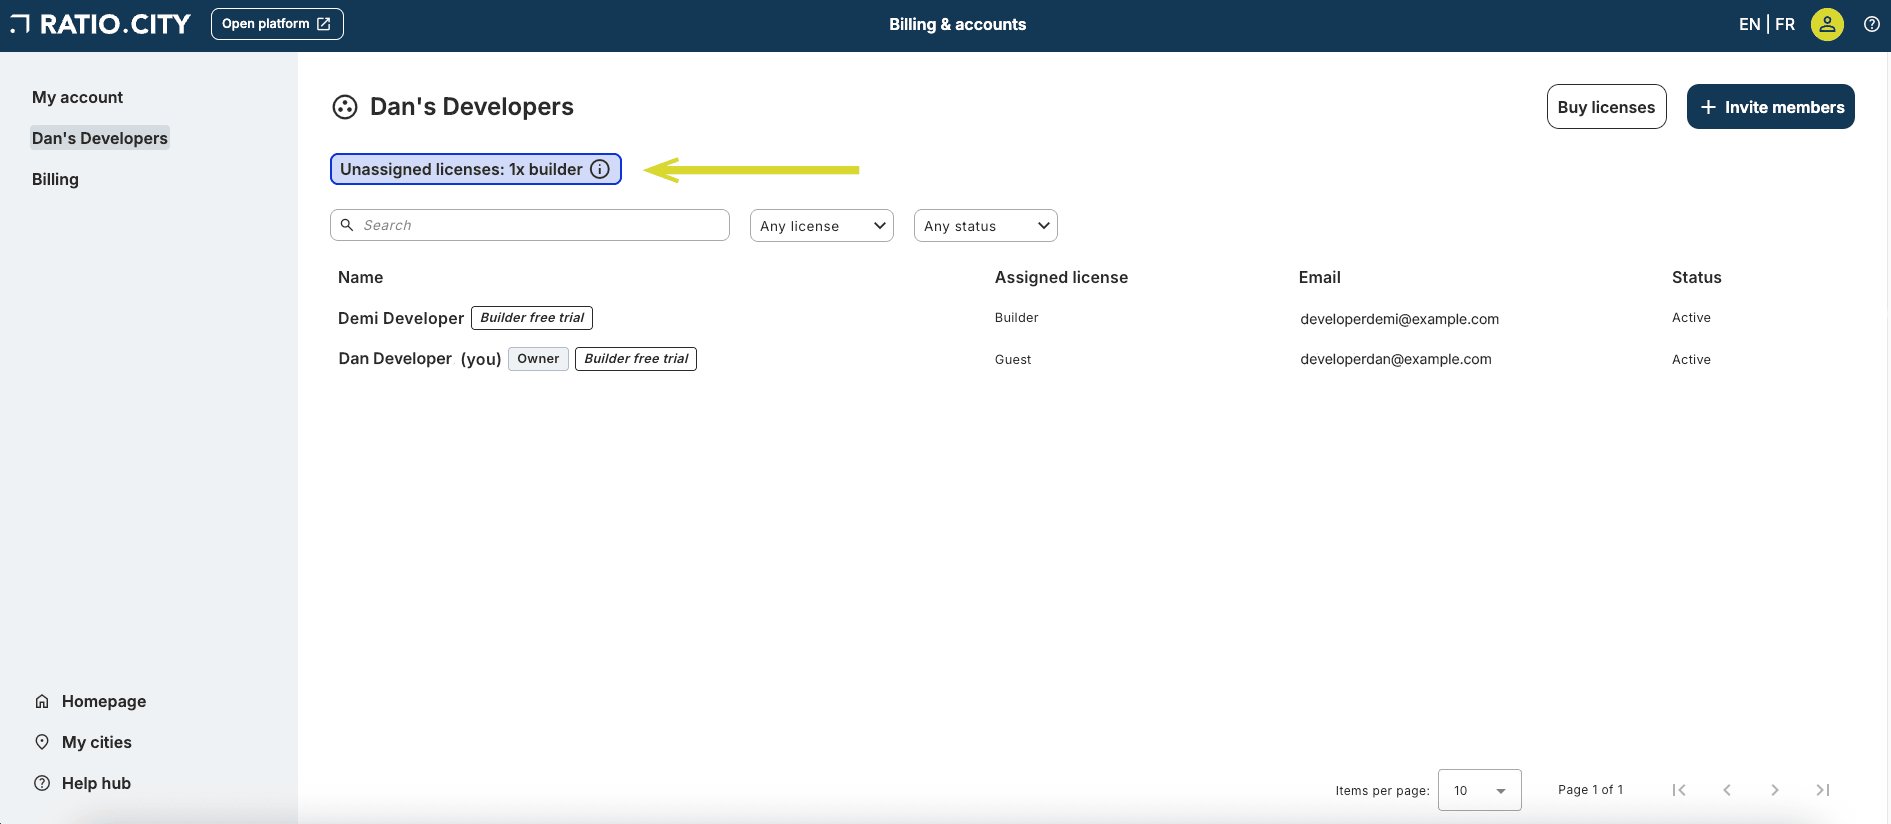
The blue tag at the top of the screen (below the organization name) shows how many unassigned licenses you have available to assign or give out. To assign an available license, follow the steps below:
Find the organization member you want to give the license to in your list (you can use the search)
In the ‘Assigned license’ column for that person, click the dropdown arrow
The available license options will appear and you can select one to assign it
The blue tag at the top will then update to show the accurate number of available unassigned licenses or disappear if there are no unassigned licenses remaining.
You can change and reassign licenses among your organization members at any time. Changing your members’ licenses will affect their feature and file access on the Ratio.City platform. Their files will not be deleted, but they may not be able to work on them again until they regain access to specific features. It’s good practice to ensure your organization members do not need to access files before making changes to their license.
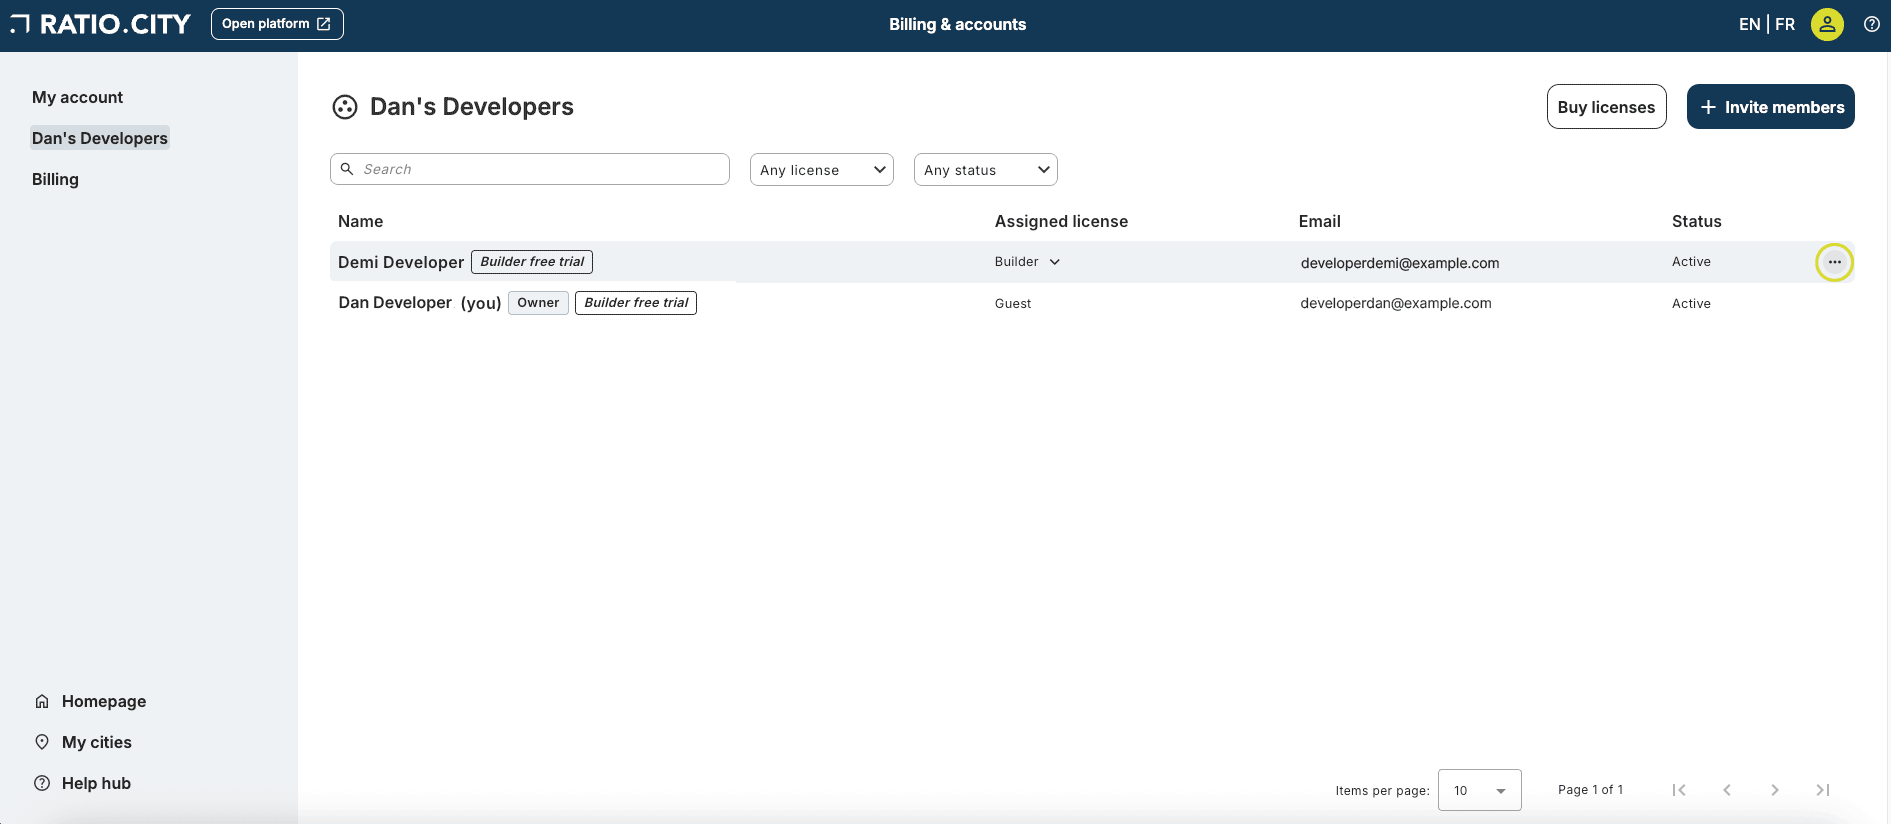
Upgrade Explorer licenses to Builder licenses
You have the option to upgrade an assigned Explorer license to a Builder license. This can be done by hovering over the user (with the assigned Explorer license) and clicking ‘…’ and selecting the ‘Upgrade license’ option. This will open a pop-up to purchase your upgrade.
Upgrading a license in the middle of a billing cycle will result in an immediate pro-rated fee charged to the credit card on file, with a new invoice generated immediately. The pro-rated amount will be shown before you complete the purchase.
💡 Note: Upgrading a license does not result in a net increase in your number of licenses for the organization. If you want to increase your total number of licenses, you can purchase additional licenses as outlined in the ‘Purchase additional licenses for my organization’ section. Ratio.City does not provide any refunds on purchases, so the licenses purchased will be available for the term of the agreement.
💡 Note: Owners cannot upgrade an Explorer license that has been cancelled.
Deactivate or reactivate members
Owners can deactivate a user to remove their access to the Ratio.City platform. This is appropriate when someone has left the company and no longer requires access to the platform. To do this, hover over the user, click ‘…’, and select ‘deactivate user’. You can also reactivate the user through the same process.
Deactivating a user is not cancelling a license or subscription. If the user had an assigned license at the time of deactivation, the license will become available again to be reassigned. The status of that user will be updated to show ‘deactivated’. To cancel or remove a license, please review this section.
💡 Note: Prior to deactivating a user, admin permissions of their projects and files (within the Ratio.City platform) should be managed to ensure no work is lost.
💡 Note: Applicable to users who purchased licenses outside of the storefront features.

Purchase additional licenses for my organization
If you need more licenses, you can easily add them to your subscription at any point. Click the ‘Buy licenses’ button at the top of the organization page and follow the steps in the pop-up to purchase.
You can add more Explorer and Builder licenses individually or in bulk as required. You’ll be shown the difference in cost between your new subscription (with the additional licenses) and your previous subscription, and be asked to confirm your changes and the new charge.
If you’re purchasing these additional licenses in the middle of a billing cycle, a pro-rated charge will be applied to the credit card on file at the time of purchase with a new invoice generated immediately. You’ll receive an email receipt from Stripe. Invoices and receipts are also accessible in the ‘Billing’ tab, with more details available here.

Grant or remove owner access
The person who makes the first license purchase will initially be delegated as the organization owner. There can be multiple owners within an organization, but there must be a minimum of one.
To add or remove owners from your organization, hover over the user, click ‘…’, and select ‘grant owner access’ or ‘remove owner access’ depending on which you’re trying to do. Review the pop-up for information on the permissions being granted or removed and to confirm your changes. Please review this section for further details on the roles and permissions of owners vs organization member.
💡 Note: Applicable to users who purchased licenses outside of the storefront features.
Roles & permissions of organization owners vs organization members

Organization overview as an owner
Users who purchased the licenses and/or have been granted ‘owner’ access will have access to additional features and functionality within Accounts.
Owners will be able to:
View the ‘My account’ tab where they can change their personal details
View the ‘Organization’ tab where they can:
Deactivate or reactivate users and view the status of users in their organization
View the ‘Billing’ tab where they can:

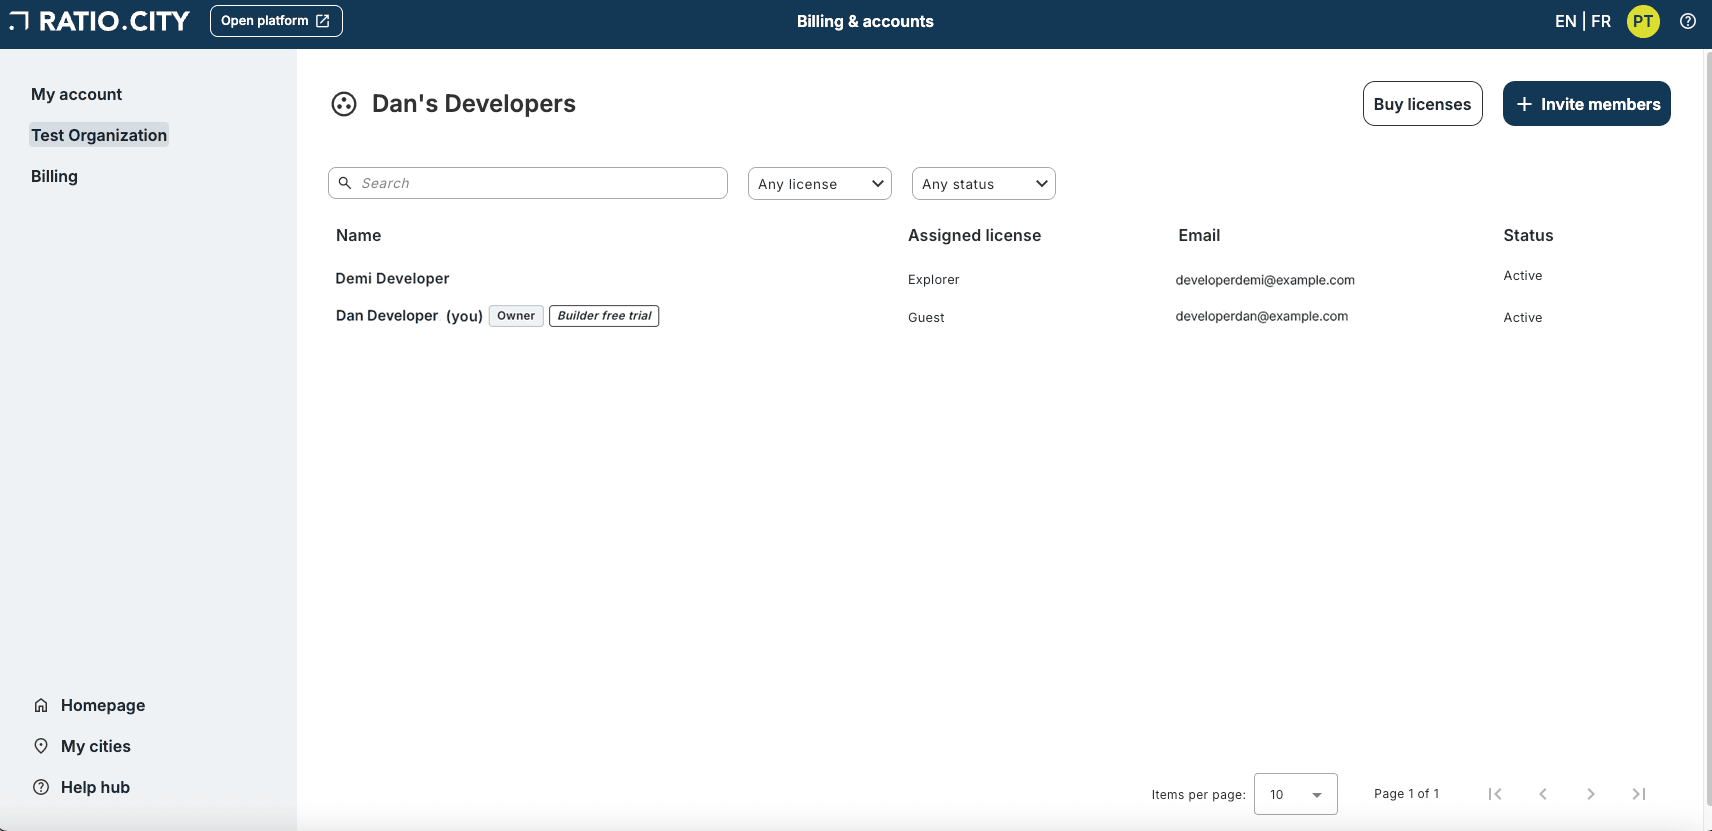
Organization overview as organization member
Users who are invited to join the organization and are NOT granted ‘owner’ access would have different view of Accounts.
Organization members will be able to:
View the ‘My account’ tab where they can change their personal details
View the ‘Organization’ tab (with limited details - see screenshot below):
View only the ‘active’ members of your team
View the organization owner(s)

Billing
Removing licenses
To remove (or cancel) licenses, you’ll first need to ensure they are unassigned on the organization page. To confirm they are unassigned, you should see a blue tag (beneath the organization's name) that outlines the total count of unassigned licenses. Next, click on the ‘Billing’ tab in the left panel. Within the first section you’ll see ‘Total paid licenses’ with a breakdown of licenses both available and unassigned. To remove, click on the ‘Remove’ button on the right. This will open a pop-up where you can set how many licenses you would like to remove.
A summary of the cost reduction on the following invoice will be provided. No refunds will be provided and as such, you’ll continue to have access to these licenses until the end of their subscription term.
💡 Note: Unassigned, expiring licenses will be shown in a yellow tag (beneath the organization name). These licenses can be assigned to users within an organization. Expiring licenses will only be used once valid licenses have been delegated. You’ll be notified with a pop-up if you are assigning an unassigned expiring license.
If a license expires while it is assigned to a user, the user will be automatically downgraded to Guest.
💡 Note: Being assigned ‘Guest’ will restrict the user's ability to open files and projects they prepared on the Ratio.City platform.
Expiring licenses will also be shown in the Billing tab, so it is clear what is active or expiring.
Update payment & billing details
Ratio.City does not store your payment and billing information. All of this is securely stored on Stripe, which you can access to update your payment method, add a new card to the file, as well as update billing and shipping information. Select the ‘Billing’ tab and click ‘Settings’ for additional tools. Under ‘Payment and billing details’, click the ‘Manage...’ button to access Stripe. Around the middle of the page in Stripe you can find the edit button for the credit card on file, an option to add a payment method, or update information (billing and shipping information).

Access invoices & receipts
Within Stripe, you can review invoices and receipts. To access these documents, select the ‘Billing’ tab and click ‘Settings’ for additional tools. Under ‘Payment and billing details’, click the ‘Manage...’ button to access Stripe (same as above). Scroll to the bottom of the Stripe page to find the invoice history section. Click on an entry to download either the receipt or the invoice for the purchase.

Cancelling organization subscription
Click on the ‘Billing’ tab in the left panel to open the summary page. Click on ‘Settings’ for additional tools. Under Plan, click the ‘Cancel subscription’ button to access Stripe.
You can cancel your subscription at any time and you will retain access to purchased licenses for the remaining duration of the subscription period. At the end of the subscription, all users will be downgraded to a Guest license with limited access to the Ratio.City platform.


FAQs
-
You can add Builder or Explorer licenses later if more members of your team are interested in using Ratio.City. Licenses can be added at any point in your billing cycle. If you are in the middle of a billing cycle, you will be charged the prorated price before you checkout.
-
Yes, you can reassign any of your current Builder or Explorer licenses from one user within your organization to another. To do this, access your organization’s users in the Organization section and use the ‘Assigned license’ dropdown to make changes. Please note that a user’s access to their files and projects can be affected by license changes.
-
No, owners can maintain a ‘Guest’ license which has no cost associated with it.
-
There is no limit to how many members you can have in your organization. Members can be assigned paid Builder or Explorer licenses, or they can have limited access to the platform with the free Guest license. If you have more than five paid users, you may qualify for a volume discount—contact our team for more information.
-
Your organization refers to the formal structure of people who typically work for the same business. An organization also is associated with payments of licenses to access Ratio.City. A team (within a Ratio.City project) is a group of people who are trying to share and collaborate on files and materials generated on the platform. Teams can consist of multiple users from different organizations.
-
You can change your license at the end of your billing term. If you want to upgrade from an Explorer license to a Builder license in the middle of an annual billing term, you can do so via the Billing section, and you will be shown the pro-rated price before you checkout.
-
Yes, if you have any unassigned (unused) licenses, you can mark them for removal at the end of your billing cycle. You can do this in the ‘Billing’ section by clicking ‘Remove’. Note that the licenses must be unassigned before they can be removed. The license will be accessible until the end of the billing period. The license(s) will be removed for the next billing cycle.
-
Yes, you can cancel your subscription at any time by going to the Billing section and clicking on ‘Cancel’. Follow the steps in Stripe to cancel your subscription. You will have access to your license(s) until the end of the term. We don’t offer refunds (prorated or otherwise) on annual or monthly contracts if you cancel before the end of your current term.
-
We accept credit card payments through Stripe. If you wish to change your credit card payment details, you can do so through the ‘Billing’ section under ‘Settings’. If you need to use an alternative payment method, please contact our team at hello@ratio.city.
-
Be sure to check your junk and spam folders for Ratio.City emails. It is also possible that users have firewalls up which may prevent emails from appearing. Please check with your IT team if this is the case.
We’re here to help.
Reach out to our team at hello@ratio.city if you have any questions, feedback, suggestions, or to book a training session for yourself or your team.